What is PCB Soldering?
PCB soldering is the process of joining electronic components to a printed circuit board using solder, a metal alloy that melts at a relatively low temperature. The solder creates an electrical and mechanical connection between the component leads and the copper pads on the PCB.
Types of Soldering
There are two main types of soldering used in PCB assembly:
- Through-hole soldering
- Surface-mount soldering
Through-hole Soldering
Through-hole soldering involves inserting component leads through holes drilled in the PCB and soldering them to pads on the opposite side of the board. This method is used for larger components, such as connectors, capacitors, and resistors.
Surface-mount Soldering
Surface-mount soldering, also known as SMT soldering, involves soldering components directly onto the surface of the PCB. Surface-mount components (SMDs) are smaller and have flat leads or terminals that are soldered to pads on the same side of the board. SMT soldering is more common in modern electronics due to the smaller size of components and the increased density of PCB layouts.
Tools and Equipment for PCB Soldering
To get started with PCB soldering, you will need the following tools and equipment:
- Soldering iron
- Solder
- Flux
- Solder wick
- Tweezers
- Wire cutters
- Magnifying glass or microscope
- PCB holder
- ESD-safe mat and wrist strap
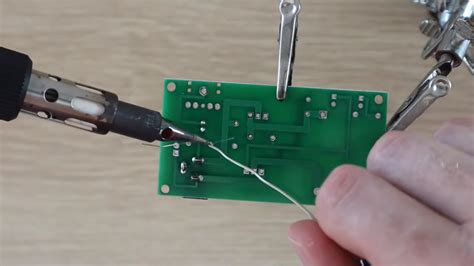
Soldering Iron
A soldering iron is the most essential tool for PCB soldering. It consists of a heated metal tip that melts the solder and a handle that allows you to hold and manipulate the iron. When choosing a soldering iron, consider the following factors:
- Wattage: A higher wattage iron heats up faster and maintains its temperature better, but it may be overkill for smaller components. A 25-50 watt iron is suitable for most PCB soldering tasks.
- Temperature control: Some soldering irons have adjustable temperature controls, which allow you to set the ideal temperature for different types of solder and components.
- Tip size and shape: The size and shape of the soldering iron tip affect how well it transfers heat to the joint. A smaller tip is better for precise work, while a larger tip is better for larger components and ground planes.
Solder
Solder is a metal alloy that melts at a relatively low temperature and is used to create electrical and mechanical connections between components and PCBs. The most common types of solder used in electronics are lead-based and lead-free solder.
Lead-based Solder
Lead-based solder typically contains 60% tin and 40% lead. It has a lower melting point than lead-free solder and is easier to work with, but it is being phased out due to environmental and health concerns.
Lead-free Solder
Lead-free solder is made from a variety of alloys, including tin, silver, and copper. It has a higher melting point than lead-based solder and can be more difficult to work with, but it is becoming the standard in electronics manufacturing due to regulations restricting the use of lead.
When choosing solder, also consider the diameter of the solder wire. A thinner diameter (e.g., 0.5mm) is better for smaller components and fine-pitch soldering, while a thicker diameter (e.g., 1.0mm) is better for larger components and through-hole soldering.
Flux
Flux is a chemical compound that helps to remove oxides and other contaminants from the surfaces being soldered, allowing the solder to flow more easily and create a stronger bond. There are two main types of flux:
- Rosin flux
- Water-soluble flux
Rosin flux is the most common type of flux used in electronics soldering. It is available in three activity levels:
- R: Rosin
- RMA: Rosin Mildly Activated
- RA: Rosin Activated
Water-soluble flux is more aggressive than rosin flux and is used for cleaning heavily oxidized surfaces. It must be cleaned off the PCB after soldering to prevent corrosion.
Solder Wick
Solder wick, also known as desoldering braid, is a braided wire coated with flux that is used to remove excess solder from a joint or to desolder components. To use solder wick, place it over the solder joint and heat it with the soldering iron. The solder will be drawn up into the wick by capillary action.
Tweezers and Wire Cutters
Tweezers are used to hold and manipulate small components during soldering. ESD-safe tweezers are recommended to prevent damage to sensitive components from electrostatic discharge.
Wire cutters are used to trim the leads of through-hole components after soldering.
Magnifying Glass or Microscope
A magnifying glass or microscope is essential for inspecting solder joints and identifying defects such as bridges, cold joints, and insufficient solder. A magnification of 10x or higher is recommended for SMT soldering.
PCB Holder
A PCB holder is a device that secures the PCB during soldering, freeing up your hands to hold the soldering iron and solder. There are several types of PCB holders, including:
- Helping hands: A flexible arm with alligator clips that can hold the PCB at various angles.
- PCB vise: A clamp that secures the PCB vertically or horizontally.
- Magnetic PCB holder: A base with magnets that hold the PCB in place.
ESD-safe Mat and Wrist Strap
An ESD-safe mat and wrist strap are used to prevent damage to sensitive components from electrostatic discharge. The mat provides a conductive surface that dissipates static charge, while the wrist strap grounds the user to the mat.

PCB Soldering Techniques
Now that you have the necessary tools and equipment, let’s discuss some PCB soldering techniques.
Through-hole Soldering
Through-hole soldering is the process of soldering components with leads that pass through holes in the PCB. Here are the steps for through-hole soldering:
- Insert the component leads through the holes in the PCB.
- Bend the leads slightly to hold the component in place.
- Heat the pad and the lead with the soldering iron.
- Apply solder to the joint, allowing it to flow around the lead and pad.
- Remove the soldering iron and let the joint cool.
- Trim the excess lead with wire cutters.
Surface-mount Soldering
Surface-mount soldering is the process of soldering components directly onto the surface of the PCB. There are two main methods for surface-mount soldering:
- Hand soldering
- Reflow soldering
Hand Soldering
Hand soldering is the process of soldering surface-mount components using a soldering iron. Here are the steps for hand soldering:
- Apply a small amount of solder to one of the pads on the PCB.
- Place the component onto the pads, aligning it with the solder.
- Heat the component lead and the pad with the soldering iron, allowing the solder to flow around the joint.
- Remove the soldering iron and let the joint cool.
- Repeat the process for the other leads.
Reflow Soldering
Reflow soldering is the process of soldering surface-mount components using a reflow oven. Here are the steps for reflow soldering:
- Apply solder paste to the pads on the PCB using a stencil or syringe.
- Place the components onto the pads, aligning them with the solder paste.
- Place the PCB in a reflow oven and heat it according to the solder paste manufacturer’s recommended temperature profile.
- The solder paste will melt and flow around the component leads, creating a strong solder joint.
- Remove the PCB from the oven and let it cool.
Soldering Tips and Tricks
Here are some tips and tricks to help you achieve better solder joints:
- Keep the soldering iron tip clean and tinned with solder to ensure good heat transfer.
- Use the appropriate amount of solder for the joint size. Too little solder can result in a weak joint, while too much solder can cause bridging or short circuits.
- Apply heat to both the pad and the component lead simultaneously to ensure a strong joint.
- Use flux to improve solder flow and create stronger joints.
- Inspect your solder joints with a magnifying glass or microscope to ensure they are properly formed and free of defects.

Common PCB Soldering Defects
Even with the best techniques and tools, PCB soldering defects can occur. Here are some common PCB soldering defects and how to prevent or fix them:
Bridging
Bridging occurs when solder flows between two adjacent pads or leads, creating an unintended electrical connection. To prevent bridging, use the appropriate amount of solder and be careful not to apply too much. If bridging occurs, use solder wick to remove the excess solder.
Cold Joint
A cold joint occurs when the solder does not flow properly, resulting in a weak or unstable connection. Cold joints can be caused by insufficient heat, dirty surfaces, or improper technique. To prevent cold joints, ensure that the surfaces are clean and apply sufficient heat to both the pad and the lead. If a cold joint occurs, reheat the joint and apply additional solder if necessary.
Insufficient Solder
Insufficient solder occurs when there is not enough solder to create a strong joint. This can be caused by using too little solder or not heating the joint long enough for the solder to flow properly. To fix insufficient solder, reheat the joint and apply additional solder.
Tombstoning
Tombstoning occurs when a surface-mount component stands up on one end due to uneven heating or solder solidification. To prevent tombstoning, ensure that both pads are heated evenly and that the component is properly aligned before soldering. If tombstoning occurs, reheat the joint and reposition the component.

PCB Soldering Safety
PCB soldering involves high temperatures and hazardous materials, so it is important to follow proper safety guidelines to protect yourself and others.
Personal Protective Equipment (PPE)
When soldering, always wear the following personal protective equipment:
- Safety glasses to protect your eyes from solder splashes and fumes.
- A fume extractor or ventilation system to remove harmful fumes from the work area.
- Heat-resistant gloves to protect your hands from burns.
Soldering Iron Safety
To prevent burns and fires, follow these soldering iron safety guidelines:
- Always place the soldering iron in a stand when not in use.
- Never leave the soldering iron unattended while it is plugged in.
- Keep flammable materials away from the soldering iron.
- Unplug the soldering iron and allow it to cool before storing it.
Solder and Flux Safety
Solder and flux can contain hazardous materials, so it is important to handle them properly:
- Use lead-free solder whenever possible to reduce exposure to lead.
- Avoid breathing in solder fumes by using a fume extractor or ventilation system.
- Wash your hands thoroughly after soldering to remove any residue.
- Dispose of used solder and flux in accordance with local regulations.
Frequently Asked Questions
Can I use a regular soldering iron for PCB soldering?
While a regular soldering iron can be used for PCB soldering, it is recommended to use a soldering iron specifically designed for electronics work. Electronics soldering irons have temperature controls and smaller tips that are better suited for the precise work required for PCB soldering.
What is the best type of solder for PCB soldering?
The best type of solder for PCB soldering depends on the application and the components being soldered. Lead-free solder is becoming the standard in electronics manufacturing due to regulations restricting the use of lead. However, lead-based solder is still used in some applications due to its lower melting point and better wetting properties.
Can I solder surface-mount components by hand?
Yes, surface-mount components can be soldered by hand using a fine-tipped soldering iron and tweezers. However, hand soldering surface-mount components requires a steady hand and good eyesight, and it may not be practical for high-volume production.
How do I remove a surface-mount component from a PCB?
To remove a surface-mount component from a PCB, use a hot air rework station or a soldering iron with a large tip to heat up the component leads simultaneously. Once the solder has melted, use tweezers to lift the component off the board. Alternatively, you can use a desoldering pump or solder wick to remove the solder from the joints before removing the component.
Can I reuse solder?
While it is possible to reuse solder, it is not recommended. Used solder can contain impurities and oxides that can affect the quality of the solder joint. It is best to use fresh solder for each new project to ensure the best possible results.
Conclusion
PCB soldering is an essential skill for anyone working with electronics. By understanding the basics of soldering, using the right tools and techniques, and following proper safety guidelines, you can create strong, reliable solder joints that will last for years. Whether you are a hobbyist or a professional, investing time and effort into mastering PCB soldering will pay off in the long run.